The Swap Begins
After gathering parts and planning for months, the time for the swap
has arrived. Actually it was helped along by the recent 750 mile
trip I took in the CRX. About 250 miles out on the return trip, the
little guy started loosing power...down and down the speed went...80...70...60...over
the period of an hour or so. Finally at about 55 MPH top speed, the
bottom dropped out...it would idle, but even flooring the throttle wouldn't
raise the RPM above about 1100. After a few minutes at the side if
the interstate checking it out, I determined that the car had developed
so much blow-by (which gets fed right back into the carb) that it was choking
itself. The quick solution was to pull the lid off the air cleaner...fresh
air coming in from all directions and the car ran pretty good again...back
on the road!!
I put in about 100 miles toward home and the speed started going down
hill again. Again I pulled over...this time to find the paper air
cleaner was on fire and flaming bits were getting sucked into the engine.
I quickly chucked the flaming paper filter, cleaned the crud out of the
carb and hit the road again. Now only 60 miles out, I know the car
is loosing power again, but I'm starting to run out of options...but working
out the loss of power versus the mileage I'm covering, it seems as though
I'll make it home...At 1am, I better, 'cause it doesn't look like anyone
would come get me!
As I pull off the interstate, with only a few miles through town to
go, the car is making a terrible hissing noise, like an air hose
that has blown a fitting, but I know it's just the blow-by. In the
faint glow of the streetlights, I can also see a burnt patch in the hood
paint from the gasses erupting straight out of the fitting on the air cleaner
housing. After nursing the thottle to keep it running through several
stop lights, I finally arrive at home...battered and burnt, but we're home!!
Needless to say, this is the last trip on the old D15...except for the
short trip up the driveway and into the garage. I've got some photos
from the work done in the couple of days after my epic trip...Ill post
more as time allows!
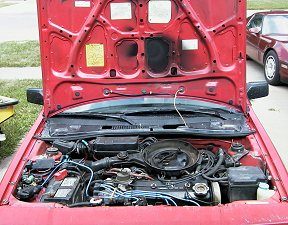
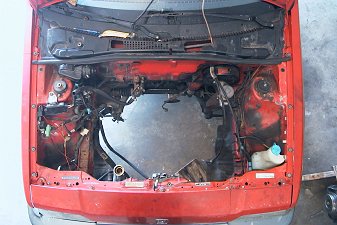
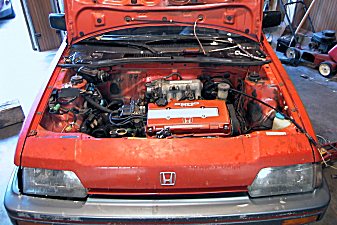
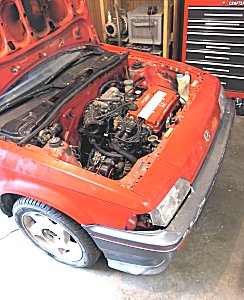
Here we are after the last trip. You will note the burnt spot
on the hood and the lack of air filter assembly. The result of my
"just get the dang thing home one more time" mentality.
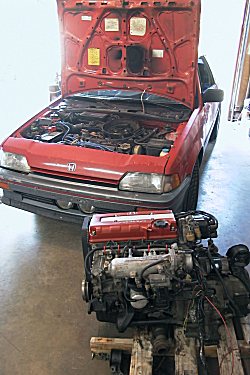
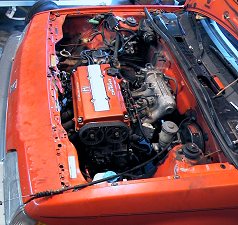
The "changing of the guard" so to speak...they meet for the first time.
I don't plan to hot-rod the hell out of the new B, (yeah right!) so hopefully
it will have a long and happy life!
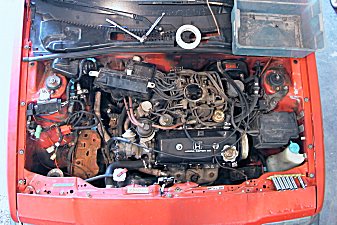
Here we are just getting started pulling the old D engine out.
I got rid of a few things on my last interstate trip...air filter, filter
housing lid, a few hoses...but now it's time to really get a bunch of junk
out of the way. Battery is first, don't want to burn down the rest
of the car! Vacuum boxes, hoses, connections...anything holding the
D to the engine bay. I always take the coolant hoses last...you can
drain oil, you can drain tranny fluid, but you will never get all the coolant
out. Every hose you cut loose drains more coolant out.
Laying in a pool of slimey green stuff to get everything else loose sucks...do
them last and the only thing lying in coolant will be the dead engine!
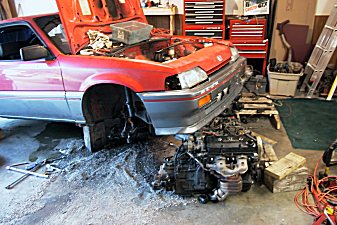
A few hours later...ker-chunk! The old D pukes out on the floor.
Allright...that's more like it...The next day, the 20 pounds of oil-dry
has done it's job on the floor, the engine bay is stripped of most extra
junk, and the "castrol super clean" test has been performed. I tried
out a few squirts followed by some scrubbing (notice the bright red patch
on the upper center of the fire wall) Now this is the cleanest spot
on the car! I just have to do the rest of the compartment.
The old engine is out, but in switching from carburetor to fuel injection,
a few other areas that need attention...do you think I would trust these
crusty gas lines with 40+ PSI of fuel pressure?!? Not a chance...they
will have to go, along with dropping the tank to install a high pressure
fuel pump.
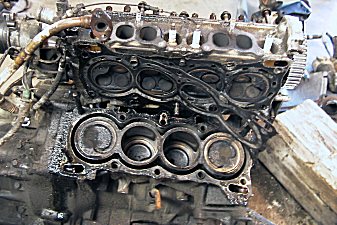
A couple of post-mortem shots on the D. The engine burned so
much oil that the combustion chambers were coated with layers of carbon.
I can just picture the little tips of each flake glowing red while the
engine was running and leading to pre-ignition of the fuel. It killed
the head gasket, and I'm guessing probably killed some piston rings too.
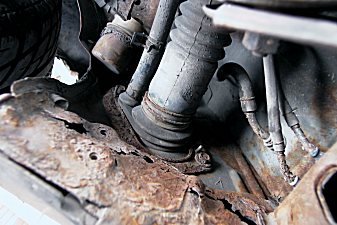
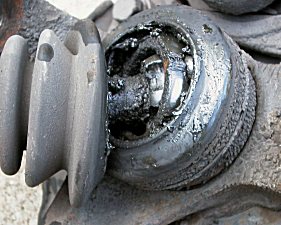
This would account for the large amount of blow-by. Also a quick
look at why CV joints click...they don't seem to like a diet of dirt and
water. I would have fixed this and other problems long ago, but I
knew this engine/drivetrain would be swapped soon anyway. But anyone
with clicking CV joints, take heart...mine clicked away for nearly 30,000
miles...just sounded like rice-crispies every time I turned...snap-crackle-pop!!
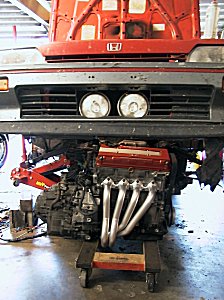
Finally, the shot we've been waiting for! Getting the B into
place! I've got several critical measurements to take in order to
make sure the engine is in the chassis straight, square, and true to the
world. Then I'll be able to machine some motor mounts to lock it it..right
now, just a test fit.
Well, I've been held up over the 4th of July weekend and I really got
the shaft on some axles! It turns out that I must have misread some
info...I thought that the 86-89 Acura Integra axles were the ones to use
for this swap, so that's what I ordered up from the salvage yard ($100).
I tore them down completely and rebuilt them with new boots and full synthetic
grease ($50). Then when I tried to put them on the car, they were
WAAAY too long. After taking some measurements, I concluded that
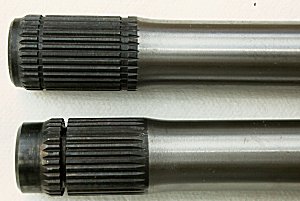
they were more the size of 90-93 Integra shafts. I wound up going
to the local parts store and using these as cores to buy some true 86-89
Shafts which were visibly shorter ($169) but it turns out that they still
don't fit. After going back through all my notes, it appears that
the only shafts that work are the custom shafts from HASport. ($259)
So, it turns out that I am out nearly $580 bucks for friggin' axles...more
than I paid for the motor. I am NOT a happy camper right now, but
I have only myself to blame. The best thing to do would have been
to take the 90-93's back to the salvage yard and trade them for the proper
axles, which I would still have to rebuild with HASport shafts which would
have saved $169...Oh Well...We'll see what happens next week when the axles
get here!
The axles came in about a week ago. Courteous service, prompt
shipping, and a decent product. Those HASport guys are OK!
(Still expensive as hell, though) My only gripe with the axles is
that there is no rust-proofing on the actual shaft. I know they are
lifetime guarantee, but they could at least shoot on some coating like
on the stock axles...nothing like some corrosion pits to make the axles
fail a few years down the road. With the new axles in, I spent the
last week tearing down my new '89 integra shafts, cleaning out the old
"new" grease and rebuilding with synthetic grease and the HASport axles.
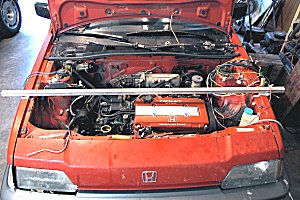
With the shafts built, I set out to get the engine aligned. The
first step was to establish some reference point. I put the aluminum
bar across the top of the engine bay, and took measurements from the tips
of the struts sticking through the towers. Now I know the bar is
parallel to the axis of rotation of the front wheels and level with the
frame of the car. The car is on a wheeled floor jack so I can move
the body up and down as well as forward/backward and right/left.
The engine is also setting on a 4 wheeled dolly which allows the fore/back,
right/left movements as well as clockwise/counterclockwise. The final
axis, rotation of the engine (think of holding the axles while the engine
rotates) was handled with some wooden wedges...I found the best fit with
about 6 degrees of rotation (higher in the back)
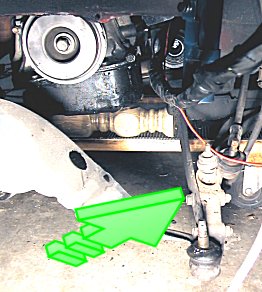
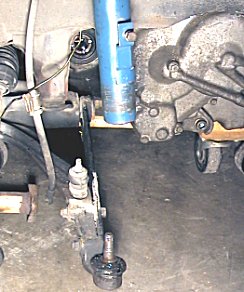
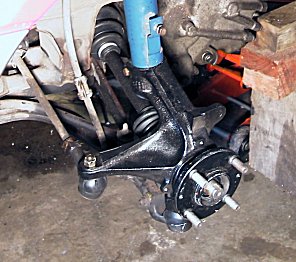
During all my measurements, something just wouldn't line up...I finally
found out that the lower support arm on the drivers side is bent back about
3/4 to 1 inch (green arrow)...must have been damaged before my ownership.
It doesn't show up too well in the pictures, but it's pretty obvious in
real life! The passenger side (right photo) appears to be OK.
I went ahead and compensated for the bend and set the location of the engine
so I could get some cardboard engine mount templates. When everything
was square to the world. I found that the engine literally has about 1/4
inch clearance on all sides. This automatic tranny is fatter than
the 5 speed!

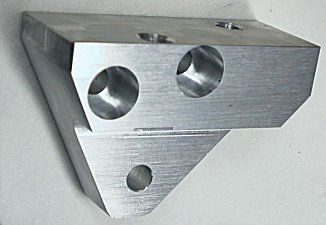
Making some progress toward the engine mounts. This engine came
with the stock rubber mounts. I think they will be sufficient for
suspension of the engine, but I need to link them to the frame somehow.
I wound up machining a new billet aluminum block for the drivers side
mount (center photo) because the mount needed to be located much closer
to the frame rail than the stock cast steel mount. The trans mount
was pretty easy (left photo), it just needed to be boosted up about 1/2
inch, then I wound up cutting a couple of pieces of plate steel (see the
pattern making method here) for both
the trans mount and the new location of the drivers side mount (right photo).
My idea now is to bolt the plates into place, get the engine dead-on located,
then tack weld the plates onto the frame. Once they are tacked, the
engine will be removed one last time (just unbolting the mounts and drop
the engine out the bottom...nothing else is hooked up yet) full weld beads
can then be applied to the mounts.
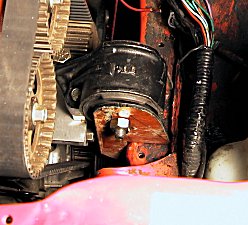
Well another couple of weeks go by. The motor mounts are
welded. I had another case of the "might-as-wells" when I had to
pull the cast iron exhaust manifold to attach the shift cable. Might
as well put on a new oil pan gasket...while I'm at it, might as well put
on a DC sports header, too! Waiting for those parts has kept me held
up 'till the 5th of August.
The header and the pan gasket finally arrived. I ordered a 4-2-1
header, but a 4-1 got shipped. I'm just ready to get things back
together, so I guess I'll make do. Couldn't bring myself to drill
into the pretty ceramic coating to weld on the O2 sensor bungs, so I'm
going to make an attempt to convert to a 4 wire sensor at the stock location
in the collector...more on that later. Right now, the CRX is getting
ready to take a huge chomp out of a B16!
Getting closer! The engine is actually bolted into place now.
I just have to go around and hook up all of the surrounding connections
(fuel, coolant, electrical, vacuum, throttle, shifter, axles, etc)
Ordinarily, this would only be a minor PITA. But because of the car's
strange new hybrid status every system has to be custom made to mate the
powerplant and car together. One minor issue...I planned for the
engine to sag about 1/8 inch when the engine mounts actually took the weight...it
really dropped about 3/8 inch. I don't think there will be a problem
because I used the rubber mount off of one of the old integra rear trailing
arms for a rear engine mount. It is STIFF! There should not be alot
of monkey-motion in the engine. If there is a problem in the future,
I can simply remove my shims and mill them down about 1/4 inch to get the
engine back on target.
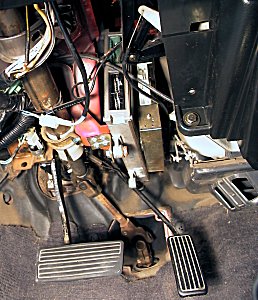
Getting some of the wiring done. I found my self searching for
a home for the ECU and TCU (engine control and transmission control)
Being lazy and not wanting to make two brackets, I pulled the lid off of
both computers and pop riveted them together...now whereever one goes,
the other is along for the ride! Then I had to find a new home for
them. I really wanted to keep the glove box so that was out.
I wanted to keep the space for the radio, too and I didn't want a huge
bulge of wires running under the carpet to put the computers under a seat,
so that was out too. I finally found just the right spot to the right
of the steering column. A space just big enough...almost like it
was made to stuff two computers in. A couple of homemade brackets
later and all is secured!
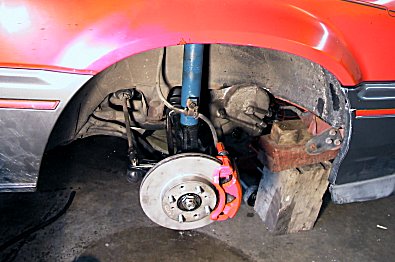
Spent most of this Saturday finsishing the rebuild on my front brake
calipers. Once those were done I could bolt up everything else...new
tie rod ends, new "custom" axles, Integra spindles with new bearings, etc.
Hopefully everything here will have a long and happy life as it's all new
or totally rebuilt. I also managed to find a company that builds
performance sway bars for front and rear. This may be an upgrade
later in the year!
.